Wednesday 21 November 2012

My Mini World of Cakes

After making figurines for these past a month, I would like to try to make some miniature cakes this time. I used to make cakes before. However, my cakes last time were much more bigger as compared to this time. My mini cakes this time measures 2 to 2.5 cm and comes in strawberry, chocolate, peppermint, coffee, mango and mixed fruits flavour. Also I have made tiny french macaroon, doughnuts, bears and babies as the cake topper. Even the dollies of the cakes are also made by clay. I used mold to make the dollies..


My Mini Cakes


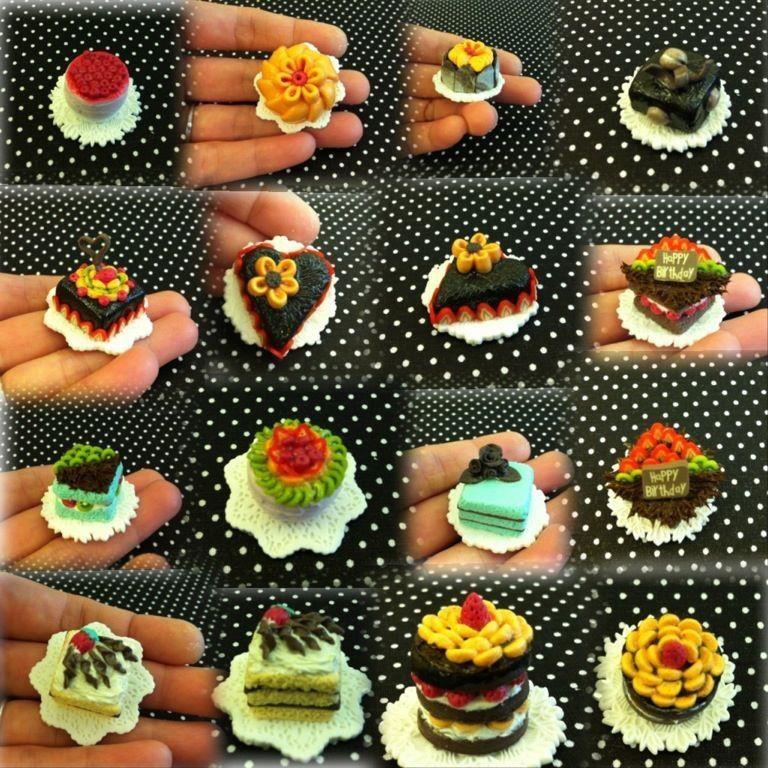
All these cakes are based on my ideas and some are based on the real cakes from the Net...For the past two weeks, I have made a total of around 50 miniature cakes. Below is a pic of my mini cakes on a piece of A4 size polka dotted paper.

My Mini cakes on a A4 size paper


Friday 2 November 2012

NEW Figurines (Pt 2)

Here comes the second part of my NEW figurines... Ready guys....


Happy Halloween guys...This witch is made for the coming Halloween Day. However, this post was a bit too late I guess. Sorry....This witch is sitting on a piece of wooden log and holding her magical broom. Exhausted from flying, she is taking a short break...haha....


Babies in animals suit
These babies are custom made for my dear sister-in-law as presents. At first, I only did the baby in the cow suit and posted it onto my facebook. And my sister-in-law saw this picture. She love my baby cow. That's why she requested me to make baby rat, sheep, dog, pig and rabbit. It was pretty simple. And I am pretty satisfied with the end result. How do you think?


The Clown
 This clown is slightly different as compared to the clown that I had made in the previous post. Two different colour of clay can really make the clown costume stand out. I myself was shocked too. Ummm... 

Exactly the same as the clown above but only different in the colour. And add a bit of glitters on the collar only. Makes it look better....


NEW version of the Clowns


This is the first time that I had made a figurine in this posture (laid down). Of course, I had learnt all these from the books and clay magazines. Just the checkered prints on the dress, shorts and the socks took me a long time. But thanks god. I finally made it.... Still not that bad I hope.. 


Have you ever heard of the story Little Red Riding Hood when you were small. This is Little Red Riding RAT with a protruding big tummy!!! haha.....Well, time to say bye bye from now... It's pretty late now... Almost 4 o'clock in the morning in HK...Gotta go and grab my beauty sleep soon. Have a nice weekend with your loved ones......

Little Red Riding RAT


Updates on my Figurines

Hi there.... It's time for me to post my NEW updates again.. Hope my latest works is not too disappointing...  Thanks for your support and viewing my blog. I really appreciate it so much. Whenever I see somebody checking out my blog, youtube or facebook, I am so HAPPY!! It motivates me to make more better and beautiful crafts.


The Bridegroom & the Chef
Maybe you might be wondering why I only made the bridegroom. And where is the bride? I did tried to make the bride but failed to make the white wedding gown. After several failed attempts, I gave up temporary. However, I will definitely try to make the bride again. As for the chef, it is much more easier to make than the bridegroom except for the chef hat. The turkey that he is holding was made long time ago. 


I realised that the hairs on the figurine need not be just brown or yellow colour only. Different hair colour will give a different feeling to the figurine. Here on the picture on the left, I have made a small girl in a jumpsuit and two flower fairies. Adding a bit of glittering stuff only on the wings and the small flower on the hat of the flower fairies will give a fantasy like feeling. I have learnt this from experience. In the past, I would put glittering stuff all over the figurines except the face, hands and legs. It seems awkward. A bit of glitters at the perfect spot of the figurines is more than enough.


Bedtime
This took me half a day to complete. The bed frame this time is made wrapping a thin film of paper clay onto a cut out polystyrene board. In my previous experience, I realised that without the polystyrene board, the clay tends to bend after dry. Also, you can cut down the amount of clay used. The eyes of the boy is made in a totally different way too. Sleepy eyes. Nite nite...... Zzzzzzz....


Puppy clinging onto a pile of towels
Among all my recent works, my favourite piece is this small puppy and the bedtime boy. For this, you will have to make the towels first and stack them together before you start on the puppy. Make texture on the towels by using a toothbrush to give it a more realistic look. Checkered, striped, plain colour and polka dot towels will create a cheerful figurine. Also dun forget to add texture to the puppy. So it will not look plain.